Save The Dates
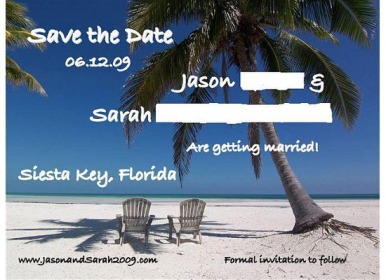
I designed our wedding STDs in Powerpoint and then uploaded it to Vistaprint. We ordered the large magnets.

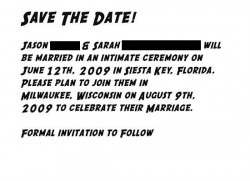
One of Jason's co-workers used to work for Marvel comics. He designed a cartoon of us based off of the famous Star Wars poster. Then Jason colorized it using Photoshop and we made it into a postcard using Vistaprint for our AHR.
Invitations
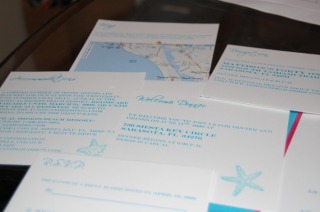
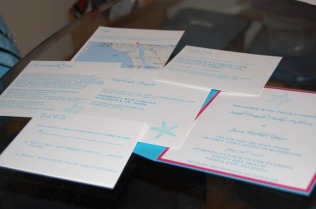
My first big DIY project. I designed the invite and inserts in Microsoft Word. See below for directions.
Supplies
12x12 Astrobrights Glisten-Lunar Blue Cardstock (AnchorPaper.com)
5 7/8"x5 7/8" Perfetto Invitation Mat-Fuchsia (cardsandpockets.com)
5 5/8"x5 5/8" Perfetto Blank Inviations-White (cardsandpockets.com)
5x5.75 Perfetto Printable Inserts-White (cardsandpockets.com)
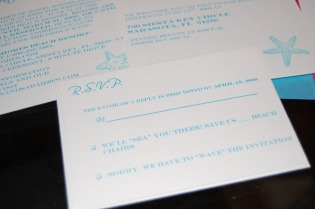
3.5"x5" RSVP Card-White (cardsandpockets.com)
Response Envelope-White (cardsandpockets.com)
Perfetto Mailing Envelope-Cream (cardsandpockets.com)
1.5" Wired Organdy Fuchsia Ribbon-Casa Collection (JoAnn Fabric)
8.5"x11" White Cardstock (Joann Fabric)
8.5"x11" Metallic Fuchsia Cardstock (JoAnn Fabric)
Versa Magic Ink pad-Sea Breeze (JoAnn Fabric)
Embossing Powder-Clear (JoAnn Fabric)
Embossing Buddy (Michael's)
Starfish Stamps (JoAnn Fabric)
Heat Tool (JoAnn Fabric)
Double Sided Scrapbooking Tape (JoAnn Fabric)
Fiskers Paper Trimmer & Scoring Blade (JoAnn Fabric)
Directions
First, let me pre-curse these directions by saying that this inviation was not hard to make at all! I put a lot of time into it, but that's only because I'm a perfectionist and I'm always thinking how I could make it look better. Also, I used white cardstock, but it would also look good with ivory or cream as well. I only ordered the white because I was scared the cream wouldn't match well with the fuchsia and lunar blue.
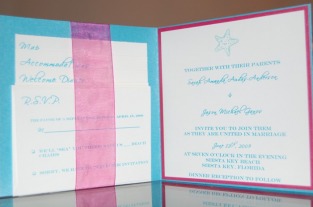
Step 1: Using a pencil and the ruler attached to the paper trimmer, make a small mark at 6" on each 12x12 sheet of cardstock. Then using the paper trimmer, cut each sheet in half using the mark you made for reference. Using the ruler again, make another mark at 6" on each 12x6 sheet you have created. Now using the scoring blade, score each sheet using the mark as a reference. Fold each sheet along the scored line. Using double sided tape, mount the invitation mat on the right side of the card.
Step 2: Design and print your Invitation and Inserts. I used Microsoft Word and fonts Scriptina (which you can download for free at Dafont.com) and Engravers MT. The font color I used was RBG: 45,185,185. I used Text Boxes to keep my information within the size of the paper I was printing on. To print you can use your home printer, but I suggest going to Kinko's or another printing place to get it done. I used my home printer for the sample and some of the inserts printed a little crooked because of the odd paper size. If you decide to print at Kinko's or somewhere else, make sure you save your files as pdf's. This way when you print them from another computer all of the fonts and spacing will not change. ***UPDATE*** If you bought or plan to buy pre-cut paper you may not be able to use a printing place. I took my files to Kinko's to print and the invitation printed crooked and the rsvp card jammed in the printer. The ink color turned out much lighter than our home printer too. In the end I printed everything on our home printer one sheet at a time (annoying!), but still saved money because I used one $18 ink cartrige rather than paying the 50 some cents per sheet that Kinko's wanted to charge.
Step 3: Cut your inserts down to size. The height of your inserts will vary depending on how many inserts you include. The height of my inserts were as follows; Map 5.5", Accommodations 5", Welcome Dinner 4.5", and Reception 4". I choose these heights based on the number of inserts I included and that the height of the RSVP was 3.5".
Step 4: *Optional*Emboss your invitations and inserts. This is the part that will take some time. I found it best to do a few at a time so I didn't have to keep turning the heat tool on and off. First take your embossing buddy and rub it over the area you are going to stamp. This will help keep the embossing powder from sticking to the paper where it shouldn't. Using a starfish stamp, or whatever stamp you want to use, stamp the invitation. Don't be afraid to be generous with the ink, it helps the embossing powder stick better. Put a piece of scrap paper under your inviation and then pour the clear embossing powder over the stamp. Don't skimp here either. All of the leftover powder will get transfered onto the scrap paper and you can pour the unused portion back into the powder container. Once you have done this turn on your heat tool and position it a few inches away from the paper at a 45 degree angle. WARNING! The heat tool gets EXTREMELY hot. Make sure your fingers are not in the hot air's path, or you will burn yourself. I almost burnt my fingerstips a few times. Don't hold the heat tool in one place too long or hold it too close to the paper or it will start to burn. Also, remember that after you turn the heat tool off it will still be very hot, so make sure it's not near anything that could melt or burn. When you are using the heat tool, the powder will melt and then rise up, that is when you know it's finished. Let the embossed paper sit and cool for a few minutes before touching it. As I said, the embossing is the most time consuming part, and it's completely optional. Another option would be to use a starfish clipart. I just liked the way the embossing looked!
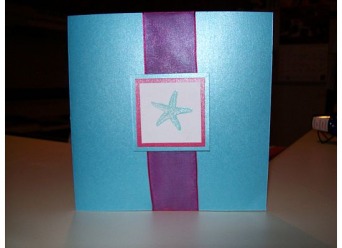
Step 5: Make your bellybands. Using the 6x6 invite, wrap your wired ribbon around the left side of the card leaving a little ribbon for overlap. Cut the ribbon and then use this ribbon as a template to measure out and cut enough ribbons for all your invites. Use double sided tape to secure the ends of each ribbon together. Next you'll make the squares that will cover the ribbon seam. Starting with the smallest square, cut 1.75"x1.75" squares using white cardstock and a paper trimmer. Next, cut 2x2" squares using metallic fushcia cardstock. Then cut 2.25"x2.25" squares using the lunar blue cardstock. Mount each square onto the other using double sided tape. Lastly, stamp and emboss the starfish. I suggest mounting the squares before you emboss because, well, I didn't and I nearly burned my fingertips trying to told the square down while I used the heat tool. Learn from my mistakes! The final step is mounting the square over the ribbon seam to complete your bellyband.
Step 6: Assemble your Invitations. Mount the invitation on the invitation mat. Slide the bellyband on the Invitation. Arrange your inserts and slide them under the bellyband so they sit across from the inviation. That's it! You're done!
